Pineapple Basil Chicken Over Cauliflower Rice in Lettuce Boats

It has been hot hot hot where we live in the recent weeks and I have been craving the fresh, juicy and a little bit spicy tastes of summer. 

Last night I made pineapple basil chicken lettuce boats and they were…amazing. Light and refreshing but also totally filling. I will be making this a LOT this summer.

Image


Ingredients:

  • 2 boneless skinless chicken breasts cut in 3/4″ cubes
  • 1 large red bell pepper
  • 1 pineapple
  • 1 head of cauliflower
  • half of a large vidalia onion
  • 1 jalapeno pepper
  • large handful of basil
  • 6 large romaine lettuce leaves
  • 1 lemon

For the terayaki-ish marinade:

  • soy sauce
  • fish sauce
  • ginger
  • lemon
  • brown sugar
  • mirin
  • rice wine vinegar
  • sesame oil

Image

The chicken cooks quickly so I prepared everything in advance while the chicken sat in the marinade for about an hour…but could be as little as twenty minutes. 

Cube the chicken and then prepare the marinade. I tend to eye and taste this to make it to my liking before adding the chicken so the measurements aren’t exact. About 1/3 cup of low sodium soy sauce, a few squirts of fish sauce, a tablespoon of sesame oil, a tablespoon of mirin, a tablespoon of rice wine vinegar, the zest and juice of one lemon, a one inch knob of ginger grated, and a bit of salt and pepper. Mix it all up and add the chicken.

While that marinates, rice the cauliflower (buzz it in the food processor for a bit), slice the pineapple, cut the onion, slice the red pepper and finely dice the skin of one jalapeno pepper (and unless you are brave, avoid the seeds). I also wash the lettuce at this point, too.

When you are ready to cook, divide the cut onion into two batches (for cooking chicken and for cooking “rice”). You will need two pans for this part. I suggest a high sided pan for the rice and a saute pan for the chicken. Add oil to both pans and, once hot, add the onion. Let it cook until translucent. In one pan, add the rice with salt and pepper. In the other, add the chicken, reserving the marinade for later. Cook one side of the chicken until browned and then flip the chicken. It will cook quickly so don’t go too far. Pour in half of the marinade and discard the rest. When the chicken is almost cooked through, add the rest of the ingredients to the chicken and cook until the pineapple begins to brown. The rice will take about the same amount of time to warm through.

To plate, fill the lettuce boats with cauliflower rice and then top with the chicken mixture. Serve and enjoy!


Sort of Farinata/Faina and Watermelon, Mint and Feta Salad

Our new au pair (“S”) is from Argentina. Prior to living with us, she lived in Minnesota for a year (brrrr!). I think she is loving California’s weather after this brutal winter. That means she has been far from home for over a year and hasn’t eaten anything from her home country in that long. So I started doing research on typical Argentinian food. Not sure if I’ve mentioned it here, but I am an awful preparer of meats. For some reason they baffle me. I can never get the crust right, the inside the right temperature. Thus, I forego, and leave it to the experts. Steak was out. What else? Empanadas? Not really in our food parameters (being encased in a flour dough, and all). And then I learned about faina. VERY similar to the Italian farinata/ceccina that we prepared when our Italian au pair was with us. I decided this was the way to go. Except, of course and as is typical of me, I changed it practically completely. Ended up being more like a nod to Argentina than an actual tribute or “taste of home”. Don’t get me wrong. It was awesomely flavorful. It just wasn’t “faina.”

Faina is traditionally make with chickpea flour, eggs (or “flax eggs”), salt, pepper and olive oil. Sometimes rosemary. Sometimes cheese. When we cooked the ceccina for E, it was blaaaaaaaand. I didn’t want that to happen again! I oomphed it up with pancetta, tomatoes, red onion, basil, oregano, kale and spinach. Mushrooms would have been EXCELLENT in this. Alas, none in the house. 

But one can’t eat farinata alone! So I picked mint, cut up a watermelon and added some feta for a fantastic spring-y salad. And, as a side, added some of the pulled rotisserie chicken that costco now sells by the bag. Have you have this?! It is the best. All of the benefits of rotisserie chicken without having the pull if off the bone. Very flavorful. 

Image

Ingredients (serves four)

Farinata

  • Cup and a half of chickpea flour
  • 3 tablespoons ground flax
  • Water as needed
  • Cup of chopped pancetta
  • One whole red onion thinly sliced
  • Handful of spinach, chopped
  • Two fronds of kale, stripped and chopped
  • Cup of cherry tomatoes, halved
  • Total of one cup of finely chopped rosemary, chopped oregano, chopped basil
  • Half a cup of crumbled feta

Salad

  • Watermelon
  • Mint
  • Feta
  • Balsamic glaze

Chicken

  • pulled rotisserie chicken 🙂


Preheat oven to 450 degrees. You are going to need a cast iron or oven safe pan for this. Set you chickpea flour base by putting the flour into a large bowl and adding water until it is the consistency of pancake batter (I suggest if you have time doing this a few hours ahead of time as I’ve heard that it makes the batter “stronger”). In a separate bowl, make your flax egg by adding water to the flax until it is moistened. Let that sit until your batter is ready.


Image

Chop the herbs, chop the spinach/kale, chop the tomato, chop the onion.

Image


Add salt and a good dose of pepper to the batter. Mix in the flax egg with a whisk. While that pulls together, saute the pancetta and onion in your cast iron pan on the stove top.

Add the kale and spinach to the pan, cooking through. Add the herbs and remaining ingredients to the batter and then the contents of the pan. Mix gently but thoroughly. Add a bit of oil to coat the bottom of the hot pan. Pour the mixture into the hot pan and put into the oven for 25-30 minutes. All ovens are different (sadly). It is finished when it is pulling away from the sides of the pan and browned on top. The interior will be soft and chewy. The exterior crispy. Let the farinata cool in the pan while you prepare the sides. Flip onto a plate once cooled. Serve as slices.

Image


The salad is easy. Chop the watermelon into bit size pieces, chop fresh mint, pour in some crumbled feta cheese and a bit of balsamic. Mix. Ta da!

I just threw a bit of the chicken into a saute pan to warm quickly. It is already cooked through so doesn’t need much.

Ham and cheese quinoa “pizza” bites

I’ve heard about these so called quinoa pizza bites here and there and I knew I wanted to make them but didn’t know when. Until we had another couple and their son over to watch the Oscars last night and I knew I wanted to have food that was somewhat “handy” but also hearty (as I didn’t want to have a lot of dishes downstairs with a 3 year old, a 2 year old and an almost 2 year old running around).

I also don’t have a mini-cupcake pan as they recommend. Probably would have helped, but they turned out pretty great anyway, if I do say so myself.

As is my wont, I looked at the recipes/directions I had seen elsewhere, looked at my fridge, and came up with my own version.

Image

Ingredients:

  • 1.5 cups quinoa
  • 3 cups chicken stock (or 2 cups chicken stock and 1 cup water)
  • half of a vidalia onion, finely chopped
  • 1 cup of chopped mushrooms
  • two leaves of kale, chopped
  • 1 cup of spinach leaves, chopped
  • 1/4 cup of fresh basil, chopped
  • 2 large eggs (I used three smallish eggs)
  • 1.5 cups shredded cheddar
  • 4 slices of ham, chopped
  • 1 tablespoon dry oregano (plus a 1/4 tablespoon in the quinoa)
  • salt/pepper
  • a pinch of red pepper flakes
  • paprika
  • grated parmesan for the top (while cooking)
  • pasta sauce (to dip)

Preheat oven to 375.

On the stovetop, cook the quinoa by putting quinoa and stock into pot, salting and adding a few dashes of the oregano and bringing to a boil. Once boiling, lower heat to simmer, cover and let sit for 15 minutes.

In a saute pan, cook the onion with a bit of olive oil until translucent, add the mushrooms and cook until softening, add the kale and a bit of salt and pepper and stir until all are cooking through and soft. (This time is when I chopped the remaining ingredients)

Add all ingredients into a bowl and mix thoroughly. Spray the cupcake sheet with Pam or the like (I use smart start). Divvy out the quinoa mixture into the cups until just over the edge (next time I may make them a bit more shallow so that they come together more quickly). Put in the oven for 30 minutes. At that time, put a bit of the parmesan on top, turn the oven up to 400 and cook for another 15 or so minutes. Test by running a knife around the sides and seeing if the “muffin” is crusty on the sides. Once they are finished, let them sit for about 10 minutes. This will help them set.

Serve with pasta sauce. Easy peasy!

Tri-tip steak with a brussel sprout and pancetta side (and grilled corn! and tomato/cucumber salad!)

We eat a lot of grilled corn around these parts. Especially in the summer. It is a specialty of Hubs and often requested by friends and our extended family.

Our lovely au pair has family in town this month and, on the night her best friend arrived, we invited him to join us for dinner. I found a lovely looking tri-tip steak at the local natural food store, too. We also had some brussel sprouts and pancetta that was reaching its life limit. And, as said before, our tomatoes are abundant. With that, a meal was made.

Image

Ingredients:

The steak

  • one large tri-tip steak
  • soy sauce (about a 1/2 cup)
  • hoisin (two tablespoons)
  • tomato paste (about a tablespoon)
  • worchestshire sauce (about a tablespoon)
  • sesame oil (one tablespoon)
  • rice wine vinegar (one tablespoon)
  • brown sugar (two tablespoons)
  • lime zest
  • salt/pepper
  • lime juice (one lime)
  • grated fresh ginger (about one inch of a knob)

The brussel sprouts

  • one cup of cubed pancetta
  • one pound of brussel sprouts, ends cut off, outer leaves removed and cut in half
  • half of a vidalia onion, cut against the grain
  • 1/4 cup white wine
  • 2 teaspoons balsamic
  • toasted pine nuts

The corn

  • as many ears of corn for as many people you have
  • one lime per four ears
  • sprinkling of salt

Tomato/cucumber salad

  • tomatoes from the garden, cut into rough chunks
  • two cucumbers peeled and cut into one inch chunks
  • basil to taste
  • balsamic to taste
  • salt/pepper

In a large glass baking dish, whisk all ingredients for the marinade (everything but the steak). Once thoroughly mixed, add the steak, fat side up, and let it sit, covered for as long as possible. Flip halfway through the amount of time you have available. I didn’t have too much time (about an hour) but it was still enough to get the flavors intermingled.

Image

While that marinates, cut your brussel sprouts and onion. In a saute pan, heat a tablespoon of olive oil (or grapeseed) and add the onions. When softening, add the pancetta and cook until done. Take them out of the pan with a slotted spoon (leaving as much of their grease as possible) and put them on a paper towel to drain.

Image

Add in the cut sprouts, cut side down and let that cook until the cut side is browning. When you see a bit of brown, add a splash of wine and a splash of balsamic and mix until all are covered.  Once the sprouts are cooked, add the pancetta and onions back in to the sprouts. This is often best if it has been sitting for a bit in the pan, letting the flavors meld together. Heat up in the pan right before serving.

When ready to cook the tri-tip, turn on your grill to the lower temperature setting. You will use the burners for the corn and the steak will be on indirect heat, on the rack above. Grill the steak on the upper rack for 15 minutes on each side with the lid closed. When the internal temperature (using an insta-read) reaches 135, take it off and let it sit covered in tin foil for 15 minutes more.  While the steak is resting, turn the heat up on grill and put the corn on. Turn only when the kernels begin to char. When charred on all sides (about 15 minutes, but maybe quicker depending on the corn), squeeze a lime over the corn and sprinkle with parmesan.

Chop the tomatoes and cucumber and mix with basil and balsamic, salt and pepper. Turn the heat up high on the sprouts to quickly heat through. Add the pine nuts now (otherwise they can get soggy).  Slice the steak into thin slices and serve!  This tri-tip was so good that we made it again a few days later.

Image

Grilled pork tenderloin with Thai-ish green sauce and charred red cabbage

You guys. YOU GUYS! This experiment? Totally worth it. I knew I wanted the charred red cabbage. But I wasn’t sure with what to pair it. It was just hubs and myself so I knew I wanted meat but I had had steak the night before (and hubs had had salmon) and we have been tiring of chicken. So we decided on pork tenderloin. When I went to the store to pick some up, there was the most succulent looking basil hitting me in the face as I walked in. And the mint in the garden is a bit out of control. So I figured why not doing something similar to my chopped chicken, Thai style. Do I stuff it like this recipe? Or make it more like a chimichurri sauce? Or chop up the pork similar to the chicken and mix it all in there together, like this? I decided on something sort of in the middle of all of that. Grill the lime and ginger rubbed pork tenderloin and then make a basil-mint-lime-ginger pesto. And holy cow. It was juicy and flavorful and really delicious.

Image

Ingredients:

The pork

  • pork tenderloin
  • salt/pepper
  • lime zest
  • ginger
  • thai chili oil
  • grapeseed oil

The pesto

  • 1 cup of basil leaves
  • 1 cup of mint leaves
  • 2 inches off a knob of ginger
  • zest of two limes
  • juice of one lime
  • half of red shallot
  • a few drops of thai chili oil
  • 1 teaspoon of finely chopped jalapeno
  • 1 teaspoon of grapeseed oil

The cabbage

  • red cabbage
  • balsamic vinaigrette of your choice

When I told Hubs what we were having for dinner, he went outside to get the grill ready. He came inside and said, “okay, we have 20 minutes worth of gas!” so I made this dinner in a MAJOR hurry.  After patting the pork dry, I quickly rubbed on a bit of salt and pepper, a few drops of the chili oil, about a teaspoon of grapeseed oil, the lime zest and ground ginger (using my plane grater). I actually wore a disposable glove for this one because, not only did I have to move quickly, but I had other things going on at the same time and wouldn’t have time to deal with chili on my hands (avoiding my eyes, the kids, etc). Put it on a cutting board and then cut the red cabbage, after having removed the outer layer, into wedges (leaving the core intact), sidling them up beside the pork. Hubs is a master vinaigrette maker and I don’t really know what goes into his (oil, balsamic, salt, pepper, mustard, and sometimes plain yogurt I think…but I asked him to leave out the yogurt on this since it would be on the grill) but really, any vinaigrette would be okay here. I brushed it on one side telling Hubs that that side should go on the grill first.

Image

Out he went and I got to making the pesto.\

After washing and drying the basil and mint, I threw all of the ingredients into the cuisinart. I pulsed them, using a spatula to pull the displaced pesto back into the mix often, until it was pureed. I tasted as I went adding a dash more of chili oil or jalapeno if it needed more spice or ginger if it needed punch. At one point I considered putting in a bit of plain yogurt to smooth it out a bit…but I’m glad I didn’t. It REALLY didn’t need it.

Image

Hubs is a master griller so can tell when things are ready by touch. I need an instaread thermometer. With the cabbage, he grilled it until the first side began to wilt and char. He then doused the other side with the vinaigrette and flipped them so that the other side would char…about 10 minutes for the first side (depending on how hot your grill gets)? The pork and the cabbage will take almost the same amount of time to cook so they were a good match. When he taken all of the cabbage and the pork off of the grill, I went out with my jug o’ pesto and doused the entire thing on while it was still toasty.

Image

This wasn’t just beautiful to look at. It was GOOOOOOOD. Hubs likes his meat a bit more cooked so he took the ends. I like my pork pink in the middle (AS IT SHOULD BE!) so I took the center pieces. Both of us were happy.  The cabbage was caramelized on the outside with some crunch and the interior was a perfect mix of bitter and sweet. The grilling really mellows the flavor and the vinaigrette ups the flavor throughout.

My dad, who was delayed on his flight to visit us last night and didn’t land until 12:30am (5 and a half hours later…) had the last remaining piece when he arrived and, even cold, he was talking about it when he woke up this morning. A hit for sure!

Tomato and Basil Quinoa

ImageAs mentioned in the last post, we are heading out of town and I am trying to use up all of the fresh veg before we go. Stupidly, on Tuesday, I bought a branch of tomatoes forgetting this fact. And the other day when I was going through the veg drawer? Four halves of yellow or white onions. No bueno. I also had a basil plant sitting on my sill that I know will go kaplewy with no water for eight days. Sounds like the perfect makings of a delicious pasta dish, no? Oh. Right. No pasta.

So let’s substitute in some quinoa, add in some fresh oregano from the garden, some chili flakes and some parm. And it was DELICIOUS! A bit onion-y…but I like onion-y.

Ingredients

  • five tomatoes chopped in medium chunks
  • one large bell pepper
  • three half onions 🙂 chopped medium/fine
  • two large stalks of fresh oregano
  • one cup of quinoa
  • two cups of chicken stock
  • one cup (before chopping) of basil, chopped
  • chili pepper flakes to taste
  • salt/pepper
  • balsamic vinegar
  • grated parmesan

ImageThe process on this one was fairly simple. Before I started, I went to the garden and grabbed two long stalks of oregano. I had too much in the end but I hate having to run back down. I measured out the quinoa and then chicken stock. Cleaned and chopped about two tablespoons of oregano (after chopping). Added some salt and pepper. Brought it to a boil. Stirred all of the ingredients. Brought the temperature down to a simmer and covered. I then let that sit for about 15 minutes.

ImageIn a large saute pan, I heated some olive oil and, when hot, added the chopped onion with a bit of salt. While that became soft (stirring occasionally), I chopped the tomatoes and then added them (and ALL of the juice I could keep) to the pan. While that began to cook, I chopped the bell pepper into small pieces and then added them to the pan. Next, I plucked all of the basil off of the plant and then chopped that into medium pieces, adding them to the pan. Then another two tablespoons of chopped fresh oregano. And then a dash of chili flakes. As the other flavors in this were relatively mild, I added more chili flakes then I normally would. A little bit of heat can be a great thing! After mixing it all up, it sat for a good ten minutes, melding all of the juices and softening the tomatoes and pepper. 

ImageWhen the quinoa was cooked, I turned it off and set it aside until the rest of the mixture was ready. When it was, I dumped the whole pot of quinoa into the saute pan so that it could soak up all of the yummy juices. Then came the balsamic. I would add, stir, then taste, repeating until it had the right amount of bite. At this point, the gas was on low/simmer. This is when you add the parm. Add as much as you want. It doesn’t hurt it. Hubs isn’t a HUGE cheese guy so I only added a bit, with more to add if anyone wanted some later. 

And that was it! A big hit in our house, too. It would have done well with spinach, too. Or even steamed broccoli.

Thyme and Lime Chicken with Crispy Leeks and Spaghetti Squash and Kale

I have more thyme than I could ever possibly use. The garden is absolutely being taken over. I use it here and there, normally, but have never cooked a meal that was heavy on the fresh thyme…now was the (wait for it) time (commence groaning now).

In my refrigerator I had chicken that needed to be cooked, a stalk of leek that was just holding on to life and a bunch of dinosaur kale. In my window I had a bag full of persian limes, a small spaghetti squash, a basil plant just screaming to be used and a gorgeous farmer’s market yellow onion.

Image

The chicken:

  • Boneless skinless chicken breasts
  • Thyme
  • 2 or 3 limes
  • Salt/Pepper
  • 1/2 of a thinly sliced leek
  • Grapeseed oil
  • 1/2 tablespoon of butter

The spaghetti squash and kale:

  • Small to medium spaghetti squash
  • 1 bunch of kale
  • Half of yellow onion
  • The other half of the leek
  • 1/4 cup of red wine (leftover wine is fine)
  • Handful of basil
  • Thyme
  • Feta
  • 1/2 tablespoon of butter

Image

I knew we wanted to eat early last night (our au pair was going to a concert) so I prepped the chicken and the marinade just after lunch and roasted the spaghetti squash.

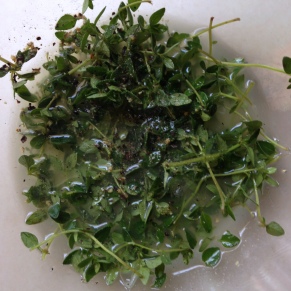
After collecting a VERY large handful of thyme and washing it, in a glass bowl I put probably a cup full of thyme and the juice of two limes (three if they are not very juicy).  I added a few tablespoons of grapeseed oil and a generous amount of salt and pepper.

The next step was the slice the chicken into smaller pieces (the better to soak up the marinade in my opinion…and it spreads out the portion so that people can take what they want to eat) and then cut the leek. To thinly slice the leek, cut off the green top, leaving the bottom root intact. Using a very sharp knife and tucked away fingers, cut the leek, from the top into a checkerboard (see picture).

Image

And THEN cut off the bottom, “rooty” portion. It should fall apart into long, thinly sliced leek. Usually about 3 inches long. If there are any pieces that aren’t cut through, tear them apart with your hands or with a paring knife.

Put the half of the leeks into the bowl with the rest of the marinade, saving the other half for the other part of the meal, and then add the chicken, pushing the chicken into the juice and squishing it into the bottom of the bowl so that all of the chicken got the yummy marinade. Put it in the fridge until you are ready to cook it, about 10 minutes before you want to serve dinner.

Image

Preheat the oven to 375.

Cut the tail off of the spaghetti squash and then, with a very sharp knife and the squash standing on the cut end allowing for it to be flat, cut the squash lengthwise.

Then clean out the seeds and the wet pulp with a spoon. I sometimes save these seeds to roast and top the meal but today I wasn’t into separating it all out.

Spray or rub the inside of the cleaned out squash  with some olive oil. Get out a cookie sheet and either cover it with parchment paper or a silpat. I used a silpat. You will be putting the squash cut side down on here. But before you do that put a few sprigs of thyme on the inside. The spaghetti squash on its own can be pretty bland. A healthy dose of herbs really does a lot to add flavor…as well as the other ingredients that we will mix in later.

Image

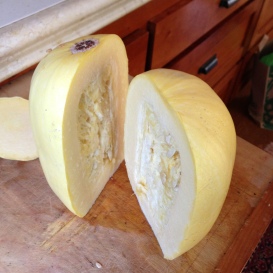
Place them face down on the cookie sheet and into the over about halfway up. Depending on how soft you want your spaghetti squash, time it from there. I wanted this to be pretty soft…but actually cooked it just a bit too long (40 minutes instead of my usual 30). I got distracted by the kids and so the squash, when I forked it out later, wash more like a mass instead of individual threads. You can tell when it is done by sticking a knife into the skin. If it goes in easily, it is finished. After roasting it looks like this:

Image

Let the squash cool for about 20 minutes (or longer) before “forking” it. Then using a pot holder to hold the outside of the squash, run a fork through the inside, forming spaghetti like threads. Set this aside.

A few hours later I came back to finish up the meal before our au pair prepared the food for the kids.

I chopped the onions and prepared the kale. The easiest way to do this, I have found, is take the stalk of kale in your hand by the white end and then pull back the towards the green leaf and the kale will separate easily. I then tore the kale into bite size pieces.

Image

In a 12 inch saute pan, I put a pat of butter. Once hot and slightly browned (YUM!), I added the chopped yellow onion and let that soften. When the onion was close to translucent, I added the kale and the rest of the leeks.

I let this cook down for a bit, until the kale was beginning to wilt. I tore the basil into small pieces (no need to be precise here…it will blend in with the kale) and threw those into the mix. I then added in a splash of red wine (OKAY, okay, I’ll admit it…it was more like a 1/4 cup. No? Alright. 1/2 a cup) to help the kale cook down and offset some of the bitterness.

Image

I cooked it over low heat until the leaves were bright green and wilted, the onions soft and the wine absorbed.

This is a good time to turn off the greens until you are ready to cook the chicken. While the chicken cooks you will add in the rest of the ingredients.

Pull out another saute pan, big enough to fit all of your chicken with about an inch between the pieces. Heat up a pat of butter in the pan and swirl it around. The chicken has been marinating with grapeseed oil so you don’t need to add more oil to the pan.

Image

My husband likes his onions, especially leeks, incredibly crispy (and practically burned…much to my chagrin). So I add them in at the beginning with the chicken and cook them at a medium temp. If you want them less crispy, add them a bit later. Save the marinade to pour back over the chicken when you flip. I don’t flip until the first side is browned. As these pieces are smaller than a full chicken breast, they take less time. Keep an eye on them. Also, make sure that you push the cooking chicken and leeks around in the juices.

Image

While the chicken is cooking, turn the kale mix back on at a low temp and add to it the spaghetti squash and sprinkle on some feta cheese and a splash more of the red wine and a squeeze of lime juice, should you have any left over.

Break up the feta so that it is throughout the dish. Same goes for the spaghetti squash…try to break it up so it isn’t in big clumps. Also, if you see any random thyme stems, pull those out. Nooooot tasty those stems! Taste and see if it needs any more salt. It may. Spaghetti squash can be WAY undersalted.

Let the feta melt, the rest of the dish heat up and all of the yummy goodness to absorb that last splash of wine and lime. As I am completely dependent on my istaread thermometer, when both sides of the chicken are properly browned, pull them off the heat when they reach 160 degrees. I usually test the smallest pieces first and pull them off if they are done before the big guys.

We served in a shallow bowl with the kale and spaghetti squash under the chicken. It was incredibly fragrant and the chicken majorly juicy with the savoriness of the thyme and leeks and the citrus of the lime.  OH! I almost forgot. I felt like it needed a bit of crunch so at the very end I also added a dash of Onion Crunch. Totally finished it right.

Image

Caprese Salad with Lamb Sausage — A leftover lunch

There is something really fulfiling about eating a meal that is either 100% farmer’s market or from the garden. In a few weeks when my tomatoes come in, there will be more garden meals…but for now, I am 100% farmer’s market at today’s lunch. And holy moly was it delish.

Image


I sliced the two leftover Prather Ranch Lamb Sausages lengthwise and dropped them flat into a hot pan. I sliced the mozzarella and tomatoes and arranged them, alternating, on the plate. I chiffonaded some basil from the garden and added a bit of balsamic glaze, fancy fluer de sel and pepper. When the sausage was cooked (having flipped it halfway through to brown both sides), I topped it with some spicy mustard. 

Fast and easy lunch…and using the ingredients from the zucchini ribbon pasta that I hadn’t finished up.  Yum.


Zucchini Ribbon Pasta with Lamb Sausage and Spinach


With our entire crew ill more often than not the past two weeks, we were all craving a bit of comfort food. The no-starch goal greatly encumbers this desire. We ended up with zucchini ribbon pasta with spinach, herbs, mozzarella, fresh tomatoes and lamb sausage from the farmer’s market.Image


Ingredients:

  • Four green zucchinis
  • Pasta sauce of your choosing
  • Fresh spinach
  • Basil, oregano, parsley or herbs of your choosing
  • Lamb sausage
  • Mozzarella
  • Tomatoes
  • Yellow Onion

Image

The first thing you will need to do is “ribbon” the zucchini. I used my mandolin but you can also use a veggie peeler. Cut the ends off and run it through trying to make the longest thinnest strips.

Image

After chopping the onion and softening half of the pile in a bit of olive oil, I tossed in the zucchini, a bit more olive oil, some salt and pepper. I let it cook down, turning often and gently.

While that is cooking, I dismantle the lamb sausage, taking the lamb out of the casing and chopping the meat into smaller pieces. Back at the oven, in a separate saute pan, I heat the rest of the onion in a bit of olive oil and, once soft, add the lamb sausage.  As it is browning and the zucchini softens, I chop the tomatoes, herbs and ready the spinach. Also chop the mozzarella into smaller bits…but set those aside.

This last bit will go quickly so it is good to have all of the ingredients ready and at hand. 

Separating the remaining ingredients between the two saute pans, add the spinach, tomatoes and herbs and pour as much pasta sauce on the zucchini as desired. It soaks up quite a bit, so be prepared with more than you think. 

Add the mozzarella chunks to the meat pan. Having more room in the pan helps the cheese melt.

Image

Almost there! When the spinach has wilted, mix the two sets of ingredients together. Voila! Delicious sort of pasta.

I served it with freshly grated parm.


Easy grillin’ sides and a leftover lunch

On Saturday we had a going away party for our German au pair whose one year stint is over and heads home this coming Sunday. We had her invite her best au pair friends over and had a traditional all-american bbq with burgers and brats, a few bottles of napa wine, some american beer, corn hole and boy bands on the sonos.  Knowing that Anne is one the no-carb bandwagon with us, we also wanted to add in some yummy and healthy sides.

The first dish was a good ol’ plain salad: spring lettuce mix, chopped carrots, bell peppers and cherry tomatoes with M’s favorite homemade dressing (olive oil, balsamic, mustard, plain yogurt, salt/pepper and a squeeze of lemon). 

Image


I then grilled up some sliced cremini mushrooms on our indoor grill pan. I used the indoor grill pan as opposed to the grill outside that we would be using later because mushrooms are small, yo. I wanted the grill marks but not for them to be inside the grill. I heated up the grill pan, placed the mushrooms flat on the pan without overlapping, drizzled some good olive oil over the top and some salt and pepper and let them brown. Once they started to get grill marks, I flipped them over and let them cook for a bit more. Once they were softening, I put them into a pile in the middle and squeezed on some of my favorite reduced balsamic glaze and then coated them evenly. I kept on repeating this process, transferring the cooked mushrooms into a bowl, until I had cooked enough for 15 people (which ended up being about 25 mushrooms). 

Image


My favorite dish of the bunch, though, was my corn salad. I made a variation of this for Thanksgiving last year and it was a hit. And it is SOOOO easy. Once again I used my favorite roasted TJ’s frozen corn. Poured a bag of it into a deep saute pan and let it defrost for a bit. While that was cooking down a bit, I ran down to my herb garden and grabbed a bunch of basil and oregano. I cleaned those bad boys up, dried them a bit and chopped them finely (a basic chiffonade is fine for both). The corn was getting warm so I added some salt and pepper, threw in a pint of cherry tomatoes, 3/4 cup of feta (reserving the last 1/4 cup until serving), a dash of red pepper flakes and the chopped herbs and cooked them down, stirring frequently as the feta can melt and burn if it isn’t being watched/stirred. At the very end, just before serving, add the rest of the feta. 

ImageA variation on this that is a bit more indulgent and that I will be making next week for a Cinco De Mayo party is what I call Mexi-corn. I use queso fresca in addition to the feta, a sh*t ton of cilantro, a bit of cumin (maybe a teaspoon), 2 tablespoons of cream cheese, 2 tablespoons of plain yogurt and I up the red pepper flakes a teeny bit. 

I’ve also make it in a savory version as well that has browned yellow onions, is cooked in a half cup of white wine, uses marjoram and thyme and cuts the tomatoes so that the juices meld into the flavor of the mash. 

Overall, the sides were well received and the night was a success! I recommend a rose to go with the summery corn dish, too. Holy yum.

Not all of the salad was eaten that night…and as I had people dress their salads on their plates, I was able to save what was left for lunch for the next day. To give the greens and veggies some heft, I heated up some delicious chicken sausage, cut into disks, and cooked them with sliced red onion. 

ImageI topped the lettuce and random veg with this tasty concoction and sprinkled them with hulled sunflower seeds.  I didn’t cook the sausage or onion with any oil so I used the fond on the bottom of the pan to make a fantastic dressing. I tossed some of that leftover rose into the pan, loosened up the fond, added a splash of olive oil, a splash of regular balsamic, a bit of salt and pepper, a tablespoon of plain yogurt and a tablespoon of spicy, horseradish mustard. Mixed it all up with a whisk and spooned it over the salad. It was awesome.

Image